07.Arduino UNO Q 物体检测——浏览器上传图片与AI实时识别
一、项目简介
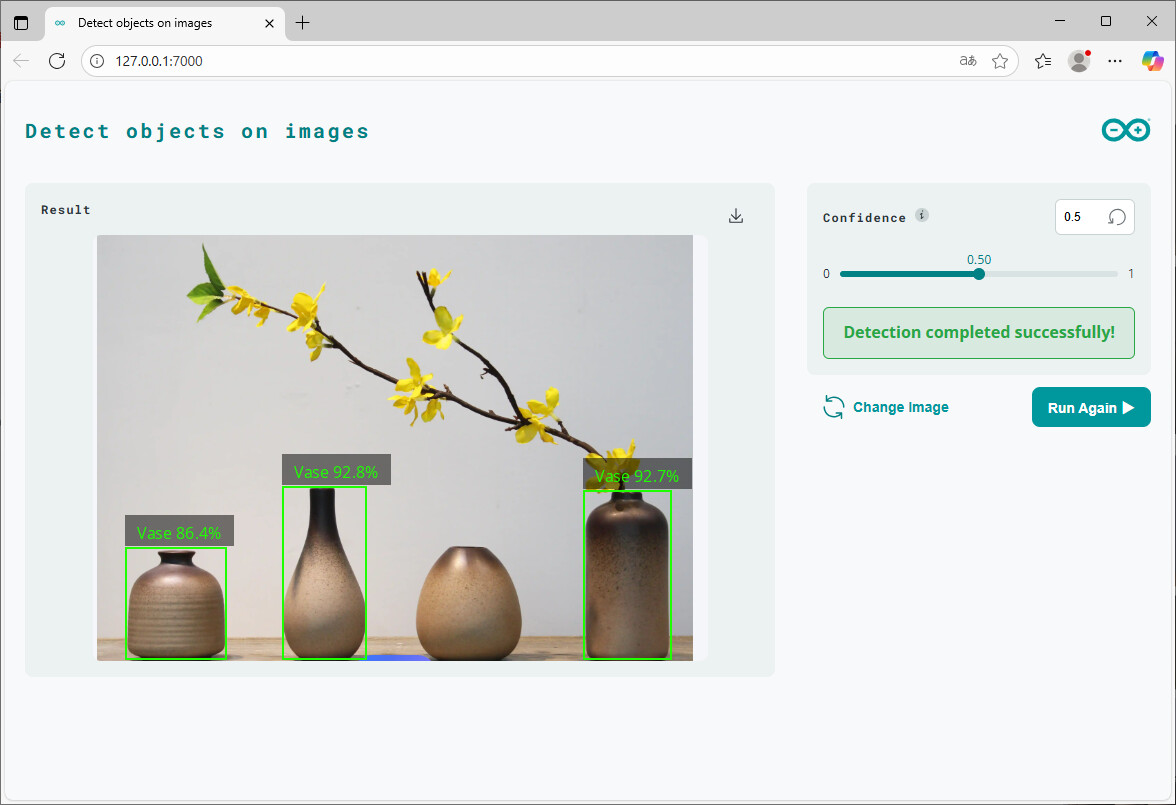
Object Detection 是 Arduino UNO Q 官方示例中的一个 AI 视觉项目,演示了如何在浏览器中上传图片,由板载 Linux 端调用物体检测模型,识别图片中的多个目标并绘制边界框。
与图像分类不同,物体检测不仅告诉你图片里有什么,还会返回每个目标的位置(边界框)和置信度。浏览器上传图片后,Python 调用 ObjectDetection Brick 进行推理,再用 draw_bounding_boxes() 把结果画回图片,最后返回带框的图片。适合用于计数、定位、告警和后续硬件控制等场景。
二、硬件准备
| 硬件 | 数量 |
|---|---|
| Arduino UNO Q(或 VENTUNO Q) | ×1 |
| USB-C® 数据线 | ×1 |
无需外接摄像头或传感器,检测在 Linux 端完成,结果通过网页展示。
三、系统架构
整个项目分为三层,UNO Q 的双芯片(Linux MPU + MCU)各司其职:
| 层级 | 跑在哪 | 干什么 |
|---|---|---|
| 前端 | 浏览器 | 上传图片、调整阈值、显示检测结果 |
| 后端 | UNO Q Linux 侧 (Python) | 图片解码、调用检测模型、绘制边界框、编码返回 |
| 模型 | UNO Q Linux 侧 (Brick) | 运行物体检测推理,输出类别+位置+置信度 |
通信方式:
- 浏览器 ↔ Python:
WebUIBrick 提供的 WebSocket,双向 JSON 消息 - Python ↔ 检测模型:直接调用
ObjectDetectionBrick 的 Python API
四、完整代码
4.1 Python 后端 —— main.py
# SPDX-FileCopyrightText: Copyright (C) Arduino s.r.l. and/or its affiliated companies
#
# SPDX-License-Identifier: MPL-2.0

"""
Object detection backend.

物体检测后端,负责接收浏览器上传的 base64 图片,
调用物体检测 Brick,绘制检测框,并把结果图片返回网页。
"""

from arduino.app_utils import *
from arduino.app_bricks.web_ui import WebUI
from arduino.app_bricks.object_detection import ObjectDetection
from PIL import Image
import io
import base64
import time

object_detection = ObjectDetection()  # Reuse one detector instance for incoming requests (复用同一个检测器实例处理请求)

def on_detect_objects(client_id, data):
    """
    Handle an object detection request from the browser.

    处理浏览器发来的物体检测请求。

    Args:
        client_id: Web UI client identifier (网页客户端标识)
        data: Message payload containing image data and confidence (包含图片数据和阈值的消息数据)

    Returns:
        None
    """
    try:
        image_data = data.get('image')
        confidence = data.get('confidence', 0.5)
        if not image_data:
            ui.send_message('detection_error', {'error': 'No image data'})
            return

        # Convert browser base64 data into a PIL image for model inference
        # 将浏览器 base64 数据转换为模型推理需要的 PIL 图片
        image_bytes = base64.b64decode(image_data)
        pil_image = Image.open(io.BytesIO(image_bytes))

        start_time = time.time() * 1000
        results = object_detection.detect(pil_image, confidence=confidence)
        diff = time.time() * 1000 - start_time

        if results is None:
            ui.send_message('detection_error', {'error': 'No results returned'})
            return

        # Convert model output into a visual result image for the browser
        # 将模型输出转换为浏览器可直接展示的结果图片
        img_with_boxes = object_detection.draw_bounding_boxes(pil_image, results)

        # Encode the annotated image back to base64 for WebSocket transfer
        # 将带检测框的图片重新编码为 base64,便于通过 WebSocket 返回
        if img_with_boxes is not None:
            img_buffer = io.BytesIO()
            img_with_boxes.save(img_buffer, format="PNG")
            img_buffer.seek(0)
            b64_result = base64.b64encode(img_buffer.getvalue()).decode("utf-8")
        else:
            img_buffer = io.BytesIO()
            pil_image.save(img_buffer, format="PNG")
            img_buffer.seek(0)
            b64_result = base64.b64encode(img_buffer.getvalue()).decode("utf-8")

        response = {
            'success': True,
            'result_image': b64_result,
            'detection_count': len(results.get("detection", [])) if results else 0,
            'processing_time': f"{diff:.2f} ms"
        }
        ui.send_message('detection_result', response)

    except Exception as e:
        ui.send_message('detection_error', {'error': str(e)})

ui = WebUI()

ui.on_message('detect_objects', on_detect_objects)

App.run()
 关键代码说明
| 代码 | 干了什么 |
|---|---|
object_detection = ObjectDetection() |
全局创建检测器实例,避免每次请求重复加载模型,提高响应速度 |
data.get('confidence', 0.5) |
从消息中获取置信度阈值,未提供时默认 0.5 |
base64.b64decode(image_data) |
将浏览器上传的 base64 字符串解码为二进制图片数据 |
Image.open(io.BytesIO(image_bytes)) |
把二进制数据包装成 PIL 图像对象,供模型推理使用 |
object_detection.detect(pil_image, confidence=confidence) |
执行物体检测,返回包含类别、置信度、边界框的字典 |
draw_bounding_boxes(pil_image, results) |
将检测结果绘制到原图上,生成带框图片 |
img_buffer.seek(0) |
重置缓冲区指针,确保从开始位置读取数据 |
ui.send_message('detection_result', response) |
把结果(图片、数量、耗时)通过 WebSocket 推送给前端 |
4.2 前端页面(App Lab 自动生成)
前端由 index.html + app.js 组成(App Lab 自动管理),主要功能:
- 提供图片上传控件,支持本地文件选择并预览
- 提供一个滑块用于调整置信度阈值(0.0 ~ 1.0)
- 点击 Run detection 按钮后,将图片转为 base64 并通过 WebSocket 发送
detect_objects消息 - 接收
detection_result消息,显示带框的结果图片、检测数量和耗时 - 接收
detection_error消息,弹出错误提示
五、核心机制解析
5.1 检测流程
浏览器上传图片
      ↓
前端将图片转为 base64,连同 confidence 发送 WebSocket 消息
      ↓
后端解码 base64 → PIL 图像
      ↓
调用 object_detection.detect(pil_image, confidence)
      ↓
模型返回检测结果(类别、置信度、边界框坐标)
      ↓
调用 draw_bounding_boxes() 在原图上绘制矩形框和标签
      ↓
将结果图片编码为 base64,连同统计信息返回前端
整个流程是同步阻塞的:一次请求处理完才返回结果,适合单用户交互场景。
5.2 置信度阈值的作用
置信度(confidence)表示模型认为某个检测框内确实存在该物体的概率。只有置信度高于阈值的检测结果才会被保留。
| 阈值 | 效果 |
|---|---|
| 0.1 | 几乎保留所有可能目标,误检多 |
| 0.3 | 宽松,适合目标模糊或小物体 |
| 0.5 | 平衡(默认值),大多数场景适用 |
| 0.7 | 较严格,只保留高把握目标 |
| 0.9 | 非常严格,可能漏检一些真实目标 |
实际使用中,如果发现漏检,可以适当降低阈值;如果误检太多,则调高阈值。
5.3 结果可视化
draw_bounding_boxes() 返回的图片上,每个检测到的目标周围会绘制一个矩形框,框上方标注类别名称和置信度(例如 person 0.87)。不同类别通常使用不同颜色区分。
5.4 通信与数据格式
-
请求消息(前端→后端):
{ "image": "base64编码的图片字符串", "confidence": 0.6 } -
成功响应(后端→前端):
{ "success": true, "result_image": "base64编码的带框图片", "detection_count": 3, "processing_time": "245.31 ms" } -
错误响应:
{
  "error": "No image data"
}
六、运行步骤
- 在 Arduino App Lab 中打开 Object Detection 示例
- 点击右上角 Run
- 浏览器会自动打开页面(或手动访问
http://板子名.local:7000) - 点击上传区域选择一张图片(支持 JPG/PNG 等常见格式)
- 拖动滑块调整置信度阈值(可选)
- 点击 Run detection 按钮
- 等待片刻,页面显示带边界框的结果图片、检测数量和耗时
七、参数调整
| 参数 | 位置 | 默认值 | 调整建议 |
|---|---|---|---|
confidence |
前端滑块 | 0.5 | 漏检时调低,误检时调高 |
| 图片格式 | main.py 中 img_buffer.save(format="PNG") |
PNG | 如需减小传输体积可改为 JPEG |
| 检测模型 | ObjectDetection() 初始化 |
内置模型 | 根据支持的类别选择合适模型 |
如果检测结果为空,优先检查三件事:
- 图片中目标是否清晰、大小是否合适
- confidence 是否设得过高
- 模型支持的类别是否包含该物体
八、总结
物体检测项目代码量很小(核心逻辑不到 60 行),但完整展示了 AI 推理在嵌入式设备上的应用模式:
| 技术 | 实现方式 |
|---|---|
| 图片上传与编码 | 浏览器 FileReader + base64 |
| 消息通信 | WebUI WebSocket + JSON |
| 模型推理 | ObjectDetection Brick 封装 |
| 结果后处理 | draw_bounding_boxes 可视化 |
| 性能统计 | time 模块计算推理耗时 |
| 错误处理 | try/except + 错误消息推送 |
对于想学习 Arduino UNO Q AI 能力 或 嵌入式 Web 交互应用 的朋友来说,这是一个非常简洁的入门案例。
物体检测.zip (1.4 MB)
本案例基于 Arduino UNO Q 官方示例 Object Detection,代码采用 MPL-2.0 协议。